Mdt 2013 Windows 10 Restart Mdt Starts Again
This browser is no longer supported.
Upgrade to Microsoft Edge to have advantage of the latest features, security updates, and technical support.
The deployment of operating systems and applications as well as the migration of user state can be a challenging endeavor, even when yous are equipped with appropriate tools and guidance. This reference, which is office of Microsoft® Deployment Toolkit (MDT) 2013, provides information on current known bug, possible workarounds for those issues, and troubleshooting guidance.
Note
In this certificate, Windows applies to the Windows 8.1, Windows eight, Windows 7, Windows Server 2012 R2, Windows Server 2012, and Windows Server 2008 R2 operating systems unless otherwise noted. MDT does not support ARM processor–based versions of Windows. Similarly, MDT refers to MDT 2013 unless otherwise stated.
Annotation
The Microsoft Diagnostics and Recovery Toolset (Sprint) contains powerful tools for recovering and troubleshooting client computers that practise non start or accept become unstable. You lot can utilize DaRT to determine the cause of a crash, restore lost files, and so on. You lot can also apply DaRT as a troubleshooting tool when developing and deploying a Windows operating system. For instance, if a congenital image fails to start correctly, you can start the client estimator containing the image by using ERD Commander—a diagnostic environment. And so, yous tin explore the client computer's difficult disk, view the event log, remove updates, change operating system settings, and and so on. Dart is part of the Microsoft Desktop Optimization Pack for Software Balls. For more information, meet Diagnostics and Recovery Toolset x.
Understanding Logs
Before effective troubleshooting of MDT can brainstorm, y'all must have a clear agreement of the many .log files used during an operating arrangement deployment. When yous know which log files to research for what failure condition and at what time, issues that were once mysterious and difficult to understand may get clear and understandable.
The MDT log file format is designed to be read by CMTrace. Use this tool whenever possible to read the log files, because information technology makes finding errors much easier.
The rest of this section details the log files created during deployment likewise equally during Windows Setup. This section as well provides examples of when to employ the files for troubleshooting.
MDT Logs
Each MDT script automatically creates log files when running. The names of these log files match the proper noun of the script—for example, ZTIGather.wsf creates a log file named ZTIGather.log. Each script besides updates a mutual master log file (BDD.log) that aggregates the contents of the log files that MDT scripts create. MDT log files reside in C:\MININT\SMSOSD\OSDLOGS during the deployment process. Depending on the type of deployment being conducted, the log files are moved at the completion of the deployment to either %WINDIR%\SMSOSD or %WINDIR%\TEMP\SMSOSD. For Lite Bear on Installation (LTI) deployments, the logs start in C:\MININT\SMSOSD\OSDLogs. They end up in %WINDIR%\TEMP\DeploymentLogs when the chore sequence processing is complete.
MDT creates the post-obit log files:
-
BDD.log. This is the aggregated MDT log file that is copied to a network location at the cease of the deployment if yous specify the SLShare property in the Customsettings.ini file.
-
LiteTouch.log. This file is created during LTI deployments. Information technology resides in %WINDIR%\TEMP\DeploymentLogs unless you specify the /debug:true option.
-
Scriptname*.log. This file is created by each MDT script. Scriptname represents the proper name of the script in question.
-
SMSTS.log. This file is created past the Chore Sequencer and describes all Chore Sequencer transactions. Depending on the deployment scenario, information technology may reside in %TEMP%, %WINDIR%\System32\ccm\logs, or C:\_SMSTaskSequence, or C:\SMSTSLog.
-
Wizard.log. The deployment wizards create and update this file.
-
WPEinit.log. This file is created during the Windows PE initialization process and is useful for troubleshooting errors encountered while starting Windows PE.
-
DeploymentWorkbench_id.log. This log file is created in the %temp% binder when you specify a /debug when starting the Deployment Workbench.
Configuration Director Operating Organisation Deployment Logs
For information about which operating system deployment log files created past Microsoft System Center 2012 R2 Configuration Manager, encounter Technical Reference for Log Files in Configuration Director.
When running the Windows User State Migration Tool (USMT), MDT automatically adds the logging options to save the USMT log files to the MDT log file locations. The log files and when they are created are every bit follows:
-
USMTEstimate.log. Created when estimating the USMT requirements
-
USMTCapture.log. Created by the USMT when capturing data
-
USMTRestore.log. Created by the USMT when restoring data
The ZeroTouchInstallation.vbs script automatically scans the USMT progress log files for errors and warnings. The script generates event ID 41010 to Microsoft System Centre Operations Director with the post-obit summary (where usmt_type is Judge, SCANSTATE, or LOADSTATE; error_count is the total number of errors found; and warning_count is the full number of warnings constitute):
ZTI USMT <usmt_type> reported <error_count> errors and <warning_count> warnings If the mistake count is greater than 0, this result is an Mistake type. If the warning count is greater than 0 with no errors, then the event is a Warning type. Otherwise, the event is an Informational type.
Identifying Fault Codes
Tabular array i lists the mistake codes that the MDT scripts create and provides a clarification of each error lawmaking. These error codes are recorded in the BDD.log file.
Tabular array 1. Error Codes and Their Description
| Error code | Description |
|---|---|
| 5201 | A connection to the deployment share could not be made. The deployment will not proceed. |
| 5203 | A connection to the deployment share could not be fabricated. The deployment volition non proceed. |
| 5205 | A connection to the deployment share could not be made. The deployment will not keep. |
| 5206 | The Deployment Magician was canceled or did not complete successfully. The deployment will not continue. |
| 5207 | A connection to the deployment share could not be made. The deployment will non proceed. |
| 5208 | DeploymentType is not ready. Must set some value for SkipWizard. |
| 5208 | Unable to observe the SMS Task Sequencer. The deployment will not continue. |
| 5400 | Create object: Fix class_instance = New class_name |
| 5490 | Create MSXML2.DOMDocument. |
| 5495 | Create MSXML2.DOMDocument.ParseErr.ErrCode. |
| 5496 | LoadControlFile.FindFile: ConfigFile |
| 5601 | Verify Os guid: %OSGUID% exists. |
| 5602 | Open XML with OSGUID: %OSGUID%. |
| 5610 | Verify file. |
| 5630 | Verify file: ImagePath. |
| 5640 | Verify file: ImagePath. |
| 5641 | FindFile: ImageX.exe. |
| 5643 | Find BootSect.exe. |
| 5650 | Verify directory: SourcePath. |
| 5651 | Verify directory: SourcePath\Platform. |
| 5652 | FindFile: bootsect.exe. |
| 6001 | Verify drive. |
| 6002 | Verify drive. |
| 6010 | Test for TSGUID. |
| 6020 | Robocopy returned value: Value. |
| 6021 | Robocopy returned value: Value. |
| 6101 | Check for file: DeployCab. |
| 6102 | Expand Sysprep files from DEPLOY.CAB. |
| 6111 | Run Sysprep.exe. |
| 6121 | Run Sysprep. |
| 6191 | Test for CloneTag in registry to verify Sysprep completed. |
| 6192 | Examination for SystemSetupInProgress in registry to verify Sysprep completed. |
| 6401 | Authorized DHCP server. |
| 6501 | Computer backup non possible, no network path (BackupShare, BackupDir) specified. |
| 6502 | Fault - Unable to locate IMAGEX, unable to perform backup. |
| 6601 | GetObject(... root/wmi:BCDStore). |
| 6602 | BCD.OpenStore (BCDStore). |
| 6701 | Configured protectors. |
| 6702 | Moved boot files. |
| 6703 | Create BDE division. |
| 6704 | Defragment drive. |
| 6705 | Shrink drive. |
| 6706 | Testing for more than 1 partition. |
| 6707 | Create kicking files. |
| 6708 | Encrypt the disk. |
| 6709 | Connect to MicrosoftVolumeEncryption WMI provider. |
| 6710 | Encrypting the deejay. |
| 6711 | ProtectKeyWithTPM. |
| 6712 | ProtectKeyWithTPMAndPIN. |
| 6713 | ProtectKeyWithTPMAndStartupKey. |
| 6714 | Salve external key to file. |
| 6715 | Protect with external key. |
| 6716 | Salvage external central to file. |
| 6717 | Protect fundamental with numerical countersign. |
| 6718 | GetKeyProtectorNumberialP@ssword. |
| 6718 | Save password to file. |
| 6719 | Open up PasswordFile. |
| 6720 | Encrypt the bulldoze. |
| 6721 | Open up DiskPartFile. |
| 6722 | Create partition. |
| 6723 | Get existing BDE bulldoze. |
| 6724 | Open DiskPartFile. |
| 6727 | Attempt to open DiskPartFile. |
| 6729 | Create text file DiskPartFile. |
| 6730 | Execute cmd /c DISKPART.EXE /southward DiskPartFile >> LogPath\ZTIMarkActive_diskpart.log two>&1 |
| 6731 | Observe bcdboot.exe. |
| 6732 | Connect to Microsoft TPM provider. |
| 6733 | Get a TPM instance in the provider class. |
| 6734 | Go TPM case. |
| 6735 | Check to come across if TPM is enabled. |
| 6736 | Check to see if TPM is activated. |
| 6737 | Check to see if TPM is owned. |
| 6738 | Check to meet if TPM ownership is allowed. |
| 6739 | Check to see if TPM is enabled. |
| 6740 | Bank check to encounter if TPM is activated. |
| 6741 | Check to see if TPM is owned and buying is allowed. |
| 6741 | TPM Possessor Password set |
| 6742 | TPM Owner P@ssword set to AdminP@ssword. |
| 6743 | Set TPM Possessor P@ssword to value. |
| 6744 | Check to run across if TPM is enabled. |
| 6745 | Bank check TPM possessor. |
| 6746 | Cheque for endorsement key pair. |
| 6747 | Check to see if TPM is activated. |
| 6748 | Bank check to see if TPM ownership is allowed. |
| 6749 | Convert owner p@ssword to owner authorization. |
| 6750 | Create endorsement key pair. |
| 6751 | Modify owner authorization. |
| 6752 | Run Cmd. |
| 6753 | Validate TPM. |
| 6754 | Become BDE instance. |
| 6755 | Protect cardinal with TPM. |
| 6756 | Cheque for removable media to configure. ProtectKeyWithTpmAndStartupKey. |
| 6757 | Protect cardinal with TPM and startup central. |
| 6758 | Look for BDE pin. |
| 6759 | Protect cardinal with TPM and Pin. |
| 6760 | Find removable media for BDEKeyLocation. |
| 6761 | Protect with external central. |
| 6762 | Recovery P@ssword existence saved to PasswordFile. |
| 6764 | Configure BitLocker policy. |
| 7000 | Unable to locate ZTIConfigure.xml; aborting. |
| 7001 | Looking for unattend AnswerFile. |
| 7100 | ERROR - This script should merely run in the total Os. |
| 7101 | ERROR - Non enough values supplied for generating DCPromo answer file. |
| 7102 | ERROR - Mandatory properties for creating a new replica DC were not specified. |
| 7103 | ERROR - Mandatory backdrop for creating a new child domain were non specified. |
| 7104 | Fault - Mandatory properties for creating a new forest were not specified. |
| 7105 | Fault - Mandatory properties for creating a new forest were not specified. |
| 7200 | Unable to configure DHCP server considering the service is not installed. |
| 7201 | Unable to read the scope details; GetScopeDetails() failed. |
| 7202 | Not plenty values specified for scope creation. |
| 7203 | Not enough values provided to set the IP range for this scope. |
| 7204 | No value specified for scope exclusion range. |
| 7300 | Unable to issue DNS commands. |
| 7700 | Not a New Computer scenario; exiting disk partition. |
| 7701 | Disk is not big enough for System and BDE partitions, Required = 1.5 GB. |
| 7702 | Disk is not large enough for Arrangement and WinRE partitions, Required = 10 GB. |
| 7703 | DeployRoot is on disk # DiskIndex. Running an OEM Scenario: Skip. |
| 7704 | Running an OEM Scenario: Skip. |
| 7704 | Extended and logical partitions are non allowed with BitLocker. |
| 7712 | Verify Drive/Volume Drive is nowadays. Format. |
| 7900 | FindFile: Microsoft.BDD.PnpEnum.exe. |
| 7901 | AllDrivers.Exists("GUID"). |
| 7904 | AllDrivers.Exists("GUID"). |
| 9200 | FindFile(PkgMgr.exe). |
| 9601 | Error - ZTITatoo state restore chore should exist running in the full OS; aborting. |
| 9701 | Nonzero return code from USMT estimate, rc = Error. |
| 9702 | User state capture not possible; insufficient local infinite and no network path (UDShare, UDDir) specified. |
| 9703 | Nonzero return code from USMT capture, rc = Error. |
| 9704 | No valid control line option was specified. |
| 9801 | Mistake - Attempting to deploy a client operating system to a machine running a server operating system. |
| 9802 | Mistake - Attempting to deploy a server operating organization to a car running a client operating arrangement. |
| 9803 | Fault - Machine is not authorized for upgrading (OSInstall=OSInstall); aborting. |
| 9804 | Mistake - Memory MB of memory is bereft. At least Memory MB of retentiveness is required. |
| 9805 | Mistake - Processor speed of ProcessorSpeed MHz is insufficient. At least a ProcessorSpeed MHz processor is required. |
| 9806 | ERROR - insufficient space is available on Drive. An boosted Size MB is required. |
| 9807 | ERROR - insufficient space is available on Drive. An additional Size MB is required. |
| 9901 | The ZTIWindowsUpdate script should not run in Windows PE. |
| 9902 | ZTIWindowsUpdate has run and failed besides many times. Count = Count. |
| 9903 | Unexpected issue installing the updated Windows Update Agent, rc = Error. |
| 9904 | Failed to create object: Microsoft.Update.Session. |
| 9905 | Failed to create object: Microsoft.Update.UpdateColl. |
| 9906 | Disquisitional file File was not found; aborting. |
| 10000 | Create object: Set oLTICleanup = New LTICleanup. |
| 10201 | Unable to Join Domain Domain. Stop installation. |
| 10203 | FindFile(LTISuspend.wsf). |
| 10204 | Run Program LTISuspend. |
| 41024 | Run ImageX. |
| 52012 | All the wizard parameters are not set. |
Listing 1 provides an excerpt from a log file that illustrates how to find the error lawmaking. In this excerpt, the error code reported is 5001.
List i. Excerpt from an SMSTS.log file that contains error code 5001
. . . The operating system installation failed. Please contact your system administrator for assist. The action "Zero Touch Installation - Validation" failed with exit code 5001 . . . Converting Error Codes
Many error codes presented in the log files seem cryptic and difficult to correlate to an actual error condition. All the same, the following process demonstrates how to convert an error code and obtain meaningful information that may aid in problem resolution.
Trouble: An paradigm capture fails with error code 0x80070040.
Possible Solution ane: The error code presented is in hexadecimal format that y'all need to convert to decimal format. To exercise this, you need a scientific calculator, and the estimator included with Windows operating systems is well suited to this chore.
To convert an fault code
-
Click Commencement, and so point to All Programs. Point to Accessories, and then click Figurer.
-
From the View menu, click Scientific.
-
Select Hex, and and then enter the last four digits of the code—in this case, 0040, as shown in Figure 1.
Figure 1. Error conversion
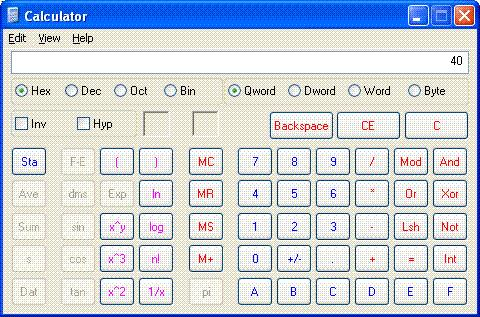
Notice that leading zeros are not displayed while the reckoner is in Hexadecimal mode.
-
Select December.
The hexadecimal value 40 is converted to a decimal value of 64.
-
Open a Command Prompt window, blazon Internet HELPMSG 64, then press ENTER.
The NET HELPMSG control translates the numerical error code into meaningful text. In the case of the error lawmaking provided here, information technology translates to "The specified network name is no longer available."
This data indicates that a networking problem may exist on the target computer or between the target computer and the server on which the deployment share resides. These bug might include network drivers not being installed properly or a mismatch in speed and duplex settings.
Review of Sample Logs
MDT creates log files that you can use to troubleshoot issues in the MDT deployment process. The following sections provide examples of how to utilise the MDT log files to troubleshoot the deployment procedure:
- Problems that relate to failures accessing the MDT database (MDT DB), as described in Failure to Access the Database
Failure to Admission the Database
Trouble: An error occurs while running a deployment that used a CustomSettings.ini file containing numerous sections and specifying, with the Priority property, the priority of each section to be processed. BDD.log contains the following fault messages:
-
ERROR - Opening Record Fix (Error Number = -2147217911) (Mistake Description: The SELECT permission was denied on the object 'ComputerAdministrators', database 'AdminDB', schema 'dbo'.)
-
ADO error: The SELECT permission was denied on the object 'ComputerAdministrators', database 'AdminDB', schema 'dbo'. (Error #-2147217911; Source: Microsoft OLE DB Provider for SQL Server; SQL State: 42000; NativeError: 229
-
Error - Unhandled mistake returned by ZTIGather: Object required (424)
Note
For clarity, the log file contents in a higher place have been represented as they appear while existence viewed using CMTrace.
Possible Solution: The issue, equally pointed out on the first line of the log file sample, is that permission to access the database was denied. Therefore, the script cannot plant a secure connection to the database, possibly considering a user ID and password were not bachelor. Equally a event, database admission was attempted using the computer account. The easiest way to work around this effect is to grant everyone Read admission to the database.
Troubleshooting
Prior to embarking on in-depth troubleshooting processes, review the following items and ensure that any associated requirements have been met:
- Installation issues tin can result if all software and hardware prerequisites take non been met.
Awarding Installation
Review the bug and solutions for application installation issues:
-
Installation source files that are blocked for security reasons equally described in Blocked Executables
-
Loss of network connectivity every bit described in Lost Network Connections
-
Installation mistake 30029 while installing the 2007 Microsoft Role system or related files every bit described in The 2007 Microsoft Part System
Blocked Executables
Trouble: If installation source files are downloaded from the Internet, it is likely that they volition be marked with one or more NTFS file system data streams. For more information about NTFS data streams, come across File Streams. The beingness of NTFS file organization data streams might crusade an Open File – Security Alarm prompt to be displayed. The installation will not proceed until you click Run at the prompt.
Effigy 2 shows, you can view NTFS file arrangement information streams using the More than control and the Streams utility.
Effigy 2. NTFS data streams

Possible Solution ane: Correct-click the installation source file, and and then click Properties. Click Unblock, and then click OK to remove the NTFS file system data streams from the file. Repeat this process for each installation source file that is blocked past the beingness of i or more than NTFS file system information streams.
Possible Solution 2: Use the Streams utility, as REF _Ref308173670 \h Figure ii shows, to remove the NTFS file organization data streams from the installation source file. The Streams utility can remove NTFS file system information streams from one or more than files or folders at once.
Lost Network Connections
Problem: An installation may fail if information technology installs device drivers or alters device and network configurations. These changes may result in a lapse in network connectivity that causes the installation to fail.
Possible Solution: Implement the ZTICacheUtil.vbs script to enable download and execution for the installation. This script is designed to tweak the advertisement to enable download and execute. The download uses Background Intelligent Transfer Service (BITS) if the Configuration Manager distribution point is Web-based Distributed Authoring and Versioning and Bits enabled. At the aforementioned time, it modifies Configuration Manager to run the ZTICache.vbs script first, which makes sure the plan does not delete itself during the deployment procedure.
The 2007 Microsoft Office Organisation
Problem: While deploying the 2007 Office system and including a Windows Installer patch (MSP) file, the installation may fail with error lawmaking 30029.
Further investigation in the ZTIApplications.log shows the following messages:
-
Near to run control:
\\Server\Deployment$\Tools\X86\bddrun.exe \\Server\Share\Microsoft\Office\2007\Professional\setup.exe /adminfile \\Server\Share\Microsoft\Office\2007\Professional\file.msp -
ZTI Heartbeat: command has been running for 12 minutes (process ID 1600) Render lawmaking from command = 30029
-
Application Microsoft Role 2007 Professional returned an unexpected return code: 30029
Possible Solution 1: Relocate the MSP file to the Updates directory, and then run setup.exe without specifying the /adminfile choice. For more than information about deploying updates during the installation, see Deploying the 2007 Office system.
Possible Solution 2: Verify that the MSP file does non take the Suppress modal bank check box selected. For more information almost configuring this setting, see Overview of 2007 Role System Deployment.
AutoLogon
Review the problems and solutions for automated logon issues:
-
Interruption of the LTI and Zero Touch Installation (ZTI) deployment processes because of logon security banners as described in Logon Security Banners
-
Interruption of the LTI and ZTI deployment processes because of prompts for user credentials as described in Prompted for User Credentials
Logon Security Banners
Problem: MDT job sequences are candy during an interactive user session, which requires that the target computer be allowed to log on automatically using a specified administrative business relationship. If a Grouping Policy object (GPO) is in place that enforces a logon security banner, this automatic logon will not be allowed to proceed, because the security banner halts the logon process while information technology waits for a user to have the stated policy.
Possible Solution: Be sure that the GPO is applied to specific organizational units (OUs) and not included in the default domain GPO. When you add computers to the domain, specify that they be added to an OU that is not affected by a GPO that enforces a logon security banner. In the Task Sequence Editor, include as i of the final chore sequence steps a script that relocates the reckoner account to the desired OU.
Note
If you are reusing existing Agile Directory® Domain Services (AD DS) accounts, ensure that prior to deploying to the target calculator you have relocated the target calculator'south business relationship to an OU that is not affected past the GPO that enforces the security logon banner.
Prompted for User Credentials
Problem: You created an image of a computer that was joined to the domain. While deploying the new paradigm to a target computer, the deployment procedure halts, considering auto-logon does not occur and the user is prompted to enter appropriate credentials. The deployment process resumes when the credentials are provided and the user is logged on.
Possible Solution: When capturing images, the source estimator should not be joined to a domain. If the figurer was joined to a domain, join the computer to a workgroup, re-capture the image, and endeavour the deployment to a target computer to determine whether the consequence is resolved.
BIOS
Trouble: While deploying to a target computer that is equipped with Intel vPro technology, the deployment may end with a cease mistake. Even though all updated drivers have been included as out-of-box drivers in the Deployment Workbench, the target computer does not start.
Possible Solution: Review the settings in the target reckoner's basic input/output organization (BIOS) to determine whether the default Series Advanced Technology Zipper manner is configured as Advanced Host Controller Interface (AHCI). Unfortunately, certain Windows operating systems do not support AHCI by default.
Database Issues
Review database-related problems and solutions:
-
Errors generated equally a effect of improperly configured firewalls on database server as described in Blocked SQL Server Browser Requests
-
Errors generated equally a result of broken connections with the database server as described in Named Pipe Connections
Blocked SQL Server Browser Requests
Problem: During the MDT deployment procedure, information can be retrieved from Microsoft SQL Server® databases. However, errors might exist generated that relate to an improperly configured firewall on the database server.
Possible Solution: The Windows Firewall in Windows Server helps forestall unauthorized access to computer resources. Even so, if the firewall is configured incorrectly, attempts to connect to a SQL Server case may be blocked. To access an example of SQL Server that is behind the firewall, configure the firewall on the figurer that is running SQL Server. For more information on configuring firewall ports for SQL Server, come across Configure the Windows Firewall to Allow SQL Server Access.
Named Pipe Connections
Problem: During the MDT deployment process, information tin can be retrieved from SQL Server databases. However, errors might be generated that relate to cleaved SQL Server connections. These tin can be caused by not enabling named pipe connections in Microsoft SQL Server.
Possible Solution: To resolve these bug, enable named pipes in SQL Server. Also, specify the SQLShare property, which it is required when making a connection to an external database using named pipes. When connecting using named pipes, use integrated security to make the connection to the database. In the case of LTI deployments, the user account that y'all specify makes the connection to the database. For ZTI deployments that employ Configuration Managing director, the network access account connects to the database. Because Windows PE has no security context by default, you must make a network connectedness to the database server to establish a security context for the user who volition be making the connection.
The network share that the SQLShare holding specifies provides a means to connect to the server to gain a proper security context. Y'all must have Read admission to the share. When the connectedness is made, you tin can then found the named pipe connection to the database. The SQLShare property is not needed and should not be used when making a TCP/IP connection to the database.
Enable named pipe connections past performing the post-obit tasks based on the version of SQL Server you are using:
-
Enable named pipe connections for SQL Server 2008 R2 equally described in Enable Named Pipe Connections in SQL Server 2008 R2.
-
Enable named pipe connections for SQL Server 2005 every bit described in Enable Named Piping Connections in SQL Server 2005.
Enable Named Pipe Connections in SQL Server 2008 R2
To enable named pipe connections in SQL Server 2008 R2, perform the post-obit steps:
-
On the computer running SQL Server 2008 R2 that hosts the database to exist queried, click Start, and then bespeak to All Programs. Point to Microsoft SQL Server 2008 R2, and then click SQL Server Direction Studio.
-
In the Microsoft SQL Server Management Studio console, in the Object Explorer, right-click sql_server_name , and then click Properties (where sql_server_name is the name of the estimator running SQL Server to be configured).
-
The Server Properties - sql_server_name dialog box is displayed.
-
In the Server Properties - sql_server_name dialog box, in Select a folio, click Connections.
-
On the Connections page, ensure the Allow remote connections to this server check box is selected so click OK.
-
Close the Microsoft SQL Server Management Studio console.
-
On the estimator running SQL Server 2008 R2 that hosts the database to be queried, click Start, and and so bespeak to All Programs. Point to Microsoft SQL Server 2008 R2, point to Configuration Tools, and then click SQL Server Configuration Director.
-
In the Sql Server Configuration Manager console, become to SQL Server Configuration Manager (Local) / SQL Server Network Configuration / Protocols for sql_instance (where sql_instance in the proper name of the SQL Server example to exist configured).
-
In the details pane, right-click Named Pipes, and and then click Enable.
The Warning dialog box appears indicating that the changes will exist saved but will non take effect until the service is stopped and restarted.
-
In the Alert dialog box, click OK.
-
In the Sql Server Configuration Manager console, go to SQL Server Configuration Managing director (Local) / SQL Server Services.
-
In the details pane, right-click SQL Server*(sql_instance) , and so click *Restart (where sql_instance in the name of the SQL Server instance that you configured in stride ii).
The SQL Server Configuration Manager progress bar is displayed that shows the condition of restarting the services. After the service restarts, the progress bar closes.
-
Close the SQL Server Configuration Managing director console.
For boosted information, How to enable remote connections in SQL Server 2008.
Enable Named Piping Connections in SQL Server 2005
To enable named pipe connections in SQL Server 2005, perform the post-obit steps:
-
On the computer running SQL Server 2005 that hosts the database to exist queried, click Offset, and then point to All Programs. Point to Microsoft SQL Server 2005, point to Configuration Tools, and so click SQL Server Surface Area Configuration.
-
In the SQL Server 2005 Surface Surface area Configuration dialog box, click Surface Area Configuration for Services and Connections.
-
In the Surface Area Configuration for Services and Connections – server_name dialog box (where server_name is the name of the reckoner running SQL Server 2005), in Select a component then configure its services and connections, go to MSSQLSERVER\Database Engine, and and so click Remote Connections.
-
Click Local and remote connections, click Using both TCP/IP and named pipes, and then click Apply.
-
In the Surface Area Configuration for Services and Connections – server_name dialog box (where server_name is the proper name of the computer running SQL Server 2005), in Select a component and then configure its services and connections, go to MSSQLSERVER\Database Engine, and so click Service.
-
Click Finish.
The MSSQLSERVER service stops.
-
Click Start.
The MSSQLSERVER service starts.
-
Click OK.
-
Shut SQL Server 2005 Surface Area Configuration.
For additional data, see the Microsoft Support article How to configure SQL Server 2005 to allow remote connections
Deployment Scripts
Review MDT-related problems and solutions:
-
Prompted for user credentials and may receive error 0x80070035 as described in Credentials_script
-
Error message "Wuredist.cab non found" appears as described in ZTIWindowsUpdate
Credentials_script
Trouble: During the last beginning-up of a newly deployed computer, the user is prompted to provide user credentials and may receive mistake 0x80070035, which indicates that the network path was not plant.
Possible Solution: Exist sure that the WIM file does not include a MININT or _SMSTaskSequence folder. To delete these folders, first use the ImageX utility to mount the WIM file, and so delete the folders.
Note
If an Access Denied error occurs when you endeavor to delete the folders from the WIM file, open a Control Prompt window, switch to the root of the image independent in the WIM file, and so run RD MININT and RD _SMSTaskSequence.
ZTIWindowsUpdate
Problem: If you utilize the ZTIWindowsUpdate.wsf script to utilise software updates during deployment, note that this script may communicate direct with the Microsoft Update website to download and install the required Windows Update Agent binaries, scan for applicable software updates, download the binaries for the applicable software updates, and then install the downloaded binaries. This process requires that your networking infrastructure be configured to allow the target computer to gain access to the Microsoft Update website.
If the deployment share does non incorporate the Windows Update Agent installation files and the target calculator does not have appropriate Net admission, error "wuredist.cab not found" is reported in the ZTIWindowsUpdate.log and BDD.log files.
Possible Solution: Follow the steps outlined in the department, "ZTIWindowsUpdate.wsf", in the MDT document Toolkit Reference.
Deployment Shares
Review deployment share–related problems and solutions:
- Updating WIM files fails when updating a deployment share as described in Failure to Update WIM Files.
Failure to Update WIM Files
In a "simple" surroundings:
-
MDT typically picks up WIMGAPI.DLL from C:\Windows\system32 (always in the path). The version of this WIMGAPI.DLL must match the version (build) of the operating system.
-
On a 64-flake operating system, MDT e'er uses the x64 WIMGAPI.DLL file; but that file should be in the system PATH. On a 32-scrap operating system, MDT always uses the x86 WIMGAPI.DLL file; merely that file should be in the system PATH. (Other products, such as Configuration Manager, use the 32-bit version of WIMGAPI.DLL, even on a 64-bit operating system, just they manage and install that version.)
Trouble: When attempting to update a deployment share, the user volition be informed that the mounting of one or more .wim files did not succeed.
Possible Solution: Open up a Control Prompt window and run where WIMGAPI.DLL. For the first entry in the listing (the showtime location found by searching the path), ensure that the Version property matches the build of the Windows Assessment and Deployment Kit (Windows ADK) that is installed. Also ensure that the property matches the operating system build number.
The Windows Deployment Wizard
Review Windows Deployment Wizard–related bug and solutions:
- Windows Deployment Wizard pages are displayed fifty-fifty when LTI is configured to skip the wizard pages as described in Wizard Pages Are Not Skipped.
Wizard Pages Are Not Skipped
Trouble: A magician page is displayed even though the MDT DB or CustomSettings.ini file specify that the magician should be skipped.
Possible Solution: To properly skip a wizard folio, include all properties that would be specified on that wizard folio where appropriate in the MDT DB or CustomSettings.ini file along with advisable values. If a property is configured improperly for a skipped wizard page, that page volition be shown. For more information nigh which properties are required to ensure that a wizard page is skipped, see the section, "Providing Properties for Skipped Deployment Wizard Pages", in the MDT document Toolkit Reference.
Disks and Partitioning
Review deejay partitioning problems and solutions:
-
BitLocker® Drive Encryption issues every bit described in BitLocker Drive Encryption
-
Disk partition errors as described in Deejay Partitioning Errors
-
Failures during Refresh Computer deployment scenarios caused past logical or dynamic disks as described in Support for Logical and Dynamic Disks
BitLocker Drive Encryption
Deploying BitLocker requires a specific configuration for proper deployment. The following potential bug may be related to the configuration of the target computer:
-
In ZTI and UDI deployments, the ZTIBde.wsf Script Fails with the Mistake "Unable to open registry cardinal 'HKEY_CURRENT_USER\Control Panel\International\LocaleName' for reading", as described in ZTIBde.wsf Script Fails with the Error "Unable to open registry key 'HKEY_CURRENT_USER\Control Panel\International\LocaleName' for reading".
-
USB devices, CD drives, DVD drives, or other removable media devices on the target computer that appear as multiple drive letters, as described in Devices Appear as Multiple Drive Letters
-
Shrinking drive C on the target computer to provide sufficient unallocated deejay space as described in Problems with Shrinking Disks
ZTIBde.wsf Script Fails with the Error "Unable to open registry key 'HKEY_CURRENT_USER\Command Console\International\LocaleName' for reading"
Problem: While trying to deploy BitLocker on the target computer in ZTI or UDI, the ZTIBde.wsf script fails with the error "Unable to open registry key 'HKEY_CURRENT_USER\Control Panel\International\LocaleName' for reading."
Possible Solution: Specify the locale in the UILanguage property. In ZTI and UDI, the ZTIBde.wsf script runs in the system control, then a full user profile is not loaded. When the ZTIBde.wsf script tries to read the locale data it is not in the registry, because the registry (user profile) is not fully loaded. Every bit a workaround, specify the locale in the UILanguage belongings.
Devices Appear as Multiple Bulldoze Letters
Trouble: Some devices can announced as multiple logical drive letters, depending on how they are partitioned. In some cases, they can emulate a 1.44-megabyte (MB) floppy disk bulldoze and a memory storage drive. Therefore, Windows may assign the same device drive messages A and B for floppy deejay emulation and F for the retention storage drive. By default, MDT scripts use the lowest drive letter (in this example, A).
Possible Solution: Override the default setting on the Specify the BitLocker recovery details page in the Windows Deployment Wizard. The Windows Deployment Magician summary folio displays a alarm to inform the user which drive alphabetic character was selected to shop BitLocker recovery information. In addition, the BDD.log and ZTIBDE.log files record the removable media devices detected and which device was selected to shop the BitLocker recovery data.
Problems with Shrinking Disks
Trouble: Not enough unallocated disk space exists on the target computer to enable BitLocker. To deploy BitLocker on a target computer, at least 2 gigabytes (GB) of unallocated disk infinite is required to create the system volume. The arrangement volume is the volume that contains the hardware-specific files needed to load Windows subsequently the BIOS has booted the computer.
Possible Solution 1: On existing computers, use the Diskpart tool to shrink bulldoze C so that the organization volume can exist created. In some instances, though, the Diskpart tool may not be able to shrink drive C sufficiently to provide 2 GB of unallocated deejay space, possibly because of fragmented disk space within drive C.
One possible solution to this problem is to defragment bulldoze C. To do and so, perform the following steps:
-
Run the Diskpart
shrink querymaxcommand to identify the maximum amount of disk space that tin can exist unallocated. -
If the value returned in step one is less than 2 GB, clean bulldoze C of any unnecessary files, and then defragment information technology.
-
Run the Diskpart
shrink querymaxcontrol again to verify that more than than 2 GB of deejay infinite tin exist unallocated. -
If the value returned in pace 3 is still less than 2 GB, perform i of the following tasks:
-
Defragment drive C multiple times to ensure that it is fully optimized.
-
Back up the data on drive C, delete the existing partition, create a new partition, then restore the data to the new segmentation.
Possible Solution 2: The ZTIBDE.wsf script runs the Disk Preparation Tool (bdehdcfg.exe) and configures the arrangement volume partition size to 2 GB by default. Y'all tin can customize the ZTIBDE.wsf script to change the default, if necessary. Yet, modifying the MDT scripts is not recommended.
-
Support for Logical and Dynamic Disks
Problem: When performing a Refresh Figurer deployment scenario, the deployment procedure may fail when deploying to a target figurer that is using logical drives or dynamic disks.
Possible Solution: MDT does non back up deploying operating systems to logical drives or dynamic disks.
Domain Join
Problem: During deployment, y'all use the Windows Deployment Magician to provide all the necessary information for the target reckoner, including credentials, domain join data, and static IP configuration. When Setup finishes, you can come across that the system has non joined the domain and is still in a workgroup.
Possible Solution: An LTI deployment of MDT configures the static IP information later the operating system is up and running. If the target calculator is located on a network segment that does not take Dynamic Host Configuration Protocol (DHCP), an automated domain join specified in Unattend.xml will fail when no DHCP is present.
Configure Unattend.xml to join a workgroup. Then, utilise the built-in Recover from Domain task sequence footstep to add a pace in the chore sequence to bring together the domain after the static IP has been applied.
Commuter Installation
To ensure the best possible user experience, installation of hardware devices and software drivers should run as seamlessly as possible, with little or no user intervention. Microsoft provides tools and guidelines to help create installation packages that meet this goal. For general information about commuter installation, see Device and Commuter Installation.
Review device commuter installation–related problems and solutions:
-
Problems that occur when using $OEM$ mass storage drivers with MDT as described in Combine $OEM$ Mass Storage Drivers with MDT Mass Storage Logic
-
Troubleshooting device driver installation issues using the SetupAPI.log every bit described in Troubleshoot Device Installation with SetupAPI.log
Troubleshoot Device Installation with SetupAPI.log
The white paper Troubleshooting Device Installation with the SetupAPI Log File provides data almost debugging Windows device installation. Specifically, the paper provides guidelines for driver developers and testers to interpret the SetupAPI log file.
One of the most useful log files for debugging purposes is the SetupAPI.log file. This plain-text file maintains the information that SetupAPI records about device installation, service pack installation, and update installation. Specifically, the file maintains a tape of device and driver changes as well as major organisation changes beginning from the most recent Windows installation. This newspaper focuses on using the SetupAPI log file to troubleshoot device installation; it does not draw the log file sections that are associated with service pack and update installations.
New Estimator Deployments
Review the problems and solutions for New Computer deployment scenarios:
- Problems starting the deployment process using Pre-Boot Execution Environment (PXE) boot equally described in PXE Boot
PXE Boot
In brief, the PXE protocol operates every bit follows: The client reckoner initiates the protocol by broadcasting a DHCP Discover parcel containing an extension that identifies the request every bit coming from a client computer that implements the PXE protocol. Bold that a kick server implementing this extended protocol is bachelor, the kicking server sends an offer containing the IP address of the server that will service the client. The client uses Footling File Transfer Protocol to download the executable file from the kick server. Finally, the client computer runs the downloaded bootstrap program.
The initial stage of this protocol piggybacks on a subset of the DHCP letters to enable the client to discover a boot server (that is, a server that delivers executable files for new computer setup). The client reckoner may utilize the opportunity to obtain an IP accost (which is the expected behavior) but is non required to practise so.
The 2nd phase of this protocol takes place between the client computer and a boot server and uses the DHCP message format as a convenient format for communication. This second phase is otherwise unrelated to the standard DHCP services. The adjacent few pages outline the step-past-step procedure during PXE client reckoner initialization.
Review the following solutions for PXE boot issues:
-
Disable Windows PE logging to SetupAPI.log as described in Disable Windows PE Logging in Windows Deployment Services.
-
Ensure that DHCP is configured properly as described in Ensure the Proper DHCP Configuration.
-
Amend the response times for assigning IP addresses to PXE client computers as described in Improve PXE IP Accost Assignment Response Fourth dimension.
Disable Windows PE Logging in Windows Deployment Services
The first procedure recommended is to make sure that logging to setupapi.log has been disabled.
Ensure the Proper DHCP Configuration
Depending on the router models in utilize, the specific router configuration of DHCP broadcast forwarding may be supported to either a subnet (or router interface) or a specific host. If the DHCP servers and the computer running Windows Deployment Services are split up computers, ensure that the routers that forward DHCP broadcasts are designed and so that both the DHCP and Windows Deployment Services servers receive the client broadcasts; otherwise, the client computer does not receive a reply to its remote kicking request.
Is there a router betwixt the customer estimator and the remote installation server that is not allowing the DHCP-based requests or responses through? When the Windows Deployment Services client computer and the Windows Deployment Services server are on separate subnets, configure the router between the ii systems to forward DHCP packets to the Windows Deployment Services server. This arrangement is necessary, because Windows Deployment Services client computers discover a Windows Deployment Services server by using a DHCP broadcast message. Without DHCP forwarding prepare on a router, the client computers' DHCP broadcasts practise non reach the Windows Deployment Services server. This DHCP forwarding procedure is sometimes referred to as DHCP Proxy or IP Helper Accost in router configuration manuals. Refer to the router instructions for more data about setting up DHCP forwarding on a specific router.
Improve PXE IP Address Consignment Response Time
Check the following elements if it is taking a long fourth dimension (fifteen–xx seconds) for the PXE client computer to retrieve an IP address:
-
Are the network adapter on the target computer and the switch or router fix to the same speed (automatic, duplex, total, and so on)
-
Is the IP accost for the Windows Deployment Services server in the IP Helper file on the router through which the connectedness is fabricated? If the list of IP addresses in the IP Helper file is long, can you motion the accost for the Windows Deployment Services server near the top
Restarting the Deployment Process
Problem: While testing and troubleshooting a new or modified task sequence, y'all may need to restart the target computer so that the deployment procedure tin start over from the kickoff. Unexpected results may occur, because MDT keeps track of its progress by writing information to the hard disk; whatever restart of the target computer has MDT resume where it left off at the previous restart.
Possible Solution: To allow the deployment procedure to restart from the commencement, delete the C:\MININT and C:\_SMSTaskSequence folders prior to restarting the target estimator.
Sysprep
Review Sysprep-related issues and solutions:
- The target computer is not appearing in the correct Ad DS OU every bit described in The Computer Account Is in the Wrong OU.
The Figurer Account Is in the Wrong OU
Problem: The target estimator is properly joined to the domain, simply the calculator business relationship is in the incorrect OU.
Possible Solution 1: If an account pre-exists for the target computer, the business relationship will remain in its original OU. To move the business relationship to the specified OU, add a task sequence footstep that uses an automation tool, such equally a Microsoft Visual Basic® Scripting Edition, to move the account.
Possible Solution two: Verify that the specified OU is in the right format and that it exists. The correct OU format should be OU=Reception,OU=NYC,DC=Woodgrovebank,DC=com.
Configuration Managing director
Problem: The error message shown in REF _Ref308174600 \h Effigy 3 is displayed when you endeavour to create a Configuration Manager PXE service indicate using the Create cocky-signed PXE certificate choice.
Figure SEQ Effigy \* ARABIC 3. PXE service point fault
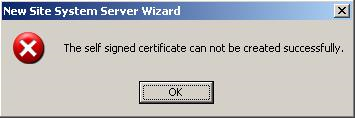
Possible Solution: If a PXE service bespeak previously existed on the server you lot are configuring, the PXE service betoken may non have deleted the self-created certificates when you lot uninstalled it. Delete the PXE certificate folder from C:\Documents and Settings\user_name\Application Information\Microsoft\Crypto\RSA, where user_name is the name of the user performing the current configuration or who performed the previous configuration. The New Site Function Wizard in the Configuration Manager panel should successfully cease when you take deleted the folder.
Chore Sequences
Review task sequence–related issues and solutions:
-
Task sequence does not finish successfully or has unpredictable behavior equally described in The Task Sequence Does Non Finish Successfully.
-
Original equipment manufacturer (OEM) task sequences in LTI are listed on boot images with the opposite processor compages every bit described in The OEM Task Sequence Incorrectly Appears for a Boot Image Created for a Different Processor Architecture.
-
The Windows Deployment Wizard displays the fault bulletin "Bad Task Sequence Item (Invalid Bone GUID)" every bit described in Bad Task Sequence Item (Invalid OS GUID) Message in the Windows Deployment Magician.
-
While configuring a network connection name, the bulletin "Please enter a valid name for the network adapter" is displayed as described in Apply Network Settings.
-
Bug that may occur as a outcome of improper configuration of continue on error configuration settings for chore sequence steps every bit described in Use Proceed on Error.
The Task Sequence Does Not Finish Successfully
Trouble: Task sequence may not cease successfully or has unpredictable behavior.
Possible Solution: The Install Operating System task sequence step (for LTI) or the Apply Operating Organisation Image task sequence footstep (for UDI and ZTI) may have been modified after the creation of the task sequence step tin can lead to unpredictable results. For case, if a task sequence was created to deploy a 32-bit Windows 8.1 paradigm, and then later the Install Operating System task sequence step or the Apply Operating System Prototype chore sequence footstep was changed to reference a 64-bit Windows 8.1 image, the task sequence may not run successfully.
It is recommended that a new task sequence is created to deploy a dissimilar operating system prototype.
The OEM Task Sequence Incorrectly Appears for a Kicking Paradigm Created for a Different Processor Compages
Problem: A task sequence based on a LTI OEM task sequence template is showing up for a boot image with a unlike processor compages. For example, an OEM task sequence that deploys a 64-bit operation system is showing on a 32-bit boot image.
Possible Solution: This is expected behavior as OEM chore sequences in LTI are not considered to exist "platform-specific" will always be listed, regardless of the processor compages of the boot paradigm.
Bad Task Sequence Item (Invalid OS GUID) Message in the Windows Deployment Sorcerer
Trouble: When running the Windows Deployment Wizard, the sorcerer displays the error message "Bad Job Sequence Particular (Invalid Bone GUID)." The operating system is listed in the OperatingSystem.xml file; notwithstanding, the operating system is not displayed in the Deployment Workbench.
Possible Solution: The original operating arrangement source has two or more WIM files associated. A SKU that is associated with a task sequence is deleted; yet, other SKUs for the operating system source still exist. When the chore sequence that references the deleted SKU is selected on the Select a task sequence to execute on this computer sorcerer folio in the Windows Deployment Magician, the mistake message "Bad Job Sequence Item (Invalid Bone GUID)" is displayed after you click Next on the wizard page.
To resolve this trouble, perform ane of the following tasks:
-
Remove all SKUs from the operating organization source. The Windows Deployment Magician behaves commonly, and the error message is not displayed.
-
Change the task sequence to use a different operating arrangement image.
Apply Network Settings
Trouble: When configuring the network connectedness proper noun in the Deployment Workbench, a validation fault prompts y'all with the message, "Please enter a valid proper noun for the network adapter."
Possible Solution: Remove whatsoever spaces and invalid characters from the specified connectedness name.
Use Continue on Fault
If a MDT job sequence is configured non to continue on error and that task sequence returns an error, all remaining task sequences in that task sequence group are skipped. Yet, the remaining task sequence groups are candy. Consider the post-obit:
Two task sequence groups have been created, and either group contains more than than one task sequence step:
-
Group A
- Stride A
- Pace B
-
Group B
- Step A
- Step B
If Group A\Step A is configured non to continue on error, then Group A\Pace B will non be candy. Withal, all task sequence steps in Group B will be processed.
The User State Migration Tool
Review USMT-related issues and solutions:
- Shortcuts that indicate to documents stored in network shared folders may not be restored properly equally described in Missing Desktop Shortcuts.
Missing Desktop Shortcuts
Problem: While using USMT to migrate user information, shortcuts that signal to network documents may non be restored. The shortcuts are captured during Scanstate; yet, they are never restored to the target estimator during Loadstate.
Possible Solution: Edit the MigUser.xml file and comment out the following line:
Original:
<include> filter='MigXmlHelper.IgnoreIrrelevantLinks()'> Modified:
<include> <!-- filter='MigXmlHelper.IgnoreIrrelevantLinks()'> --> Windows Imaging Format Files
Review WIM-related problems and solutions:
- LTI and ZTI deployments fail with WIM file errors in the BDD.log file as described in Corrupt WIM File.
Corrupt WIM File
Problem: When deploying an image, the deployment fails with the following entries in the BDD.log file:
-
The paradigm
\\Server\Deployment$\Operating Systems\Windows\version1.wimwas not applied successfully by ImageX, rc = 2 -
LTIApply COMPLETED. Return Value = ii
-
ZTI Fault - Non-zip return lawmaking by LTIApply, rc = 2
Investigate the issue past mounting the WIM file using ImageX results in the error, "The information is invalid." Further investigation shows that the date stamp of the .wim file is many years earlier the current date. It is possible that another process, such as a virus scanner, was belongings the .wim file open after it was previously closed at the decision of a Read or Write procedure.
Possible Solution: Restore the .wim file from backup media.
Windows PE
Review Windows PE–related problems and solutions:
-
The LTI or ZTI deployment process is not initiated considering of bereft RAM or wireless network adapters equally described in Deployment Process Not Initiated—Limited RAM or Wireless Network Adapter.
-
The LTI or ZTI deployment process is not initiated because of missing Windows PE components every bit described in Deployment Process Not Initiated—Missing Components.
-
The LTI or ZTI deployment process is not initiated because of missing or incorrect device drivers as described in Deployment Process Not Initiated—Missing or Incorrect Drivers.
Deployment Process Non Initiated—Limited RAM or Wireless Network Adapter
Problem: When deploying an image to certain target computers, Windows PE starts, runs wpeinit, opens a Control Prompt window only does not actually showtime the deployment process. Troubleshooting the problem by mapping a network bulldoze from the target computer indicates that the network adapter drivers are non loaded.
Possible Solution 1: The Deployment Sorcerer is not starting, because there is insufficient RAM. Verify that the target computer has at least 512 MB of RAM and that no shared video retentivity consumes more than 64 MB of the 512 MB.
The versions of Windows PE that MDT supports are unable to run on a target calculator that has less than 512 MB of RAM.
Possible Solution 2: Practise not include the wireless drivers in the Windows PE image.
Deployment Process Non Initiated—Missing Components
Problem: When troubleshooting a failed deployment, a review of the BDD.log file lists the following entry:
Fault - Unable to create ADODB.Connexion object, impossible to query SQL Server: ActiveX component tin can't create object (429).
Possible Solution: This error may indicate that the Windows PE image was not created using MDT. If yous are using Configuration Manager, do non use 1 of the existing Windows PE images that Configuration Director created; instead, create an image using the Import Microsoft Deployment Task Sequence Wizard.
Note
The Windows PE images that Configuration Manager creates contain components that back up scripting, XML, and Windows Direction Instrumentation (WMI), just they do not contain components that support Microsoft ActiveX® Data Objects (ADO).
Deployment Procedure Not Initiated—Missing or Incorrect Drivers
Trouble: When deploying to certain target computers, Windows PE starts, runs wpeinit, opens a Control Prompt window, but does not actually showtime the deployment procedure. Troubleshooting by mapping a network drive from the target computer indicates that the network adapter drivers are not loaded. A review of the SetupAPI.log file located in Ten:\Windows\System32\Inf indicates that Windows PE generates errors when information technology is configuring the network adapter, ane of which is, "This driver is not meant for this platform." The drivers in the Out-of-Box Drivers list have been injected into the image.
Possible Solution: It is possible that Windows PE is having a commuter conflict with another driver. When configuring the settings for the Windows PE epitome in the Deployment Workbench, create a Windows PE drivers grouping that contains just network adapter and storage drivers, so configure the deployment share to use but the Windows PE driver group.
Deployment Process Flow Charts
This section provides ii sets of MDT menstruation charts: 1 for LTI deployments and one for ZTI deployments with Configuration Manager. Each flow chart illustrates the tasks run during that deployment type.
Familiarize yourself with the deployment process flow charts past:
-
Reviewing the LTI deployment process flowcharts as described in LTI Deployment Procedure Flowcharts
-
Reviewing the ZTI deployment process flowcharts equally described in ZTI Deployment Process Flowcharts
LTI Deployment Process Flowcharts
Flow charts are provided for the post-obit phases:
-
Validation (Figure 4)
-
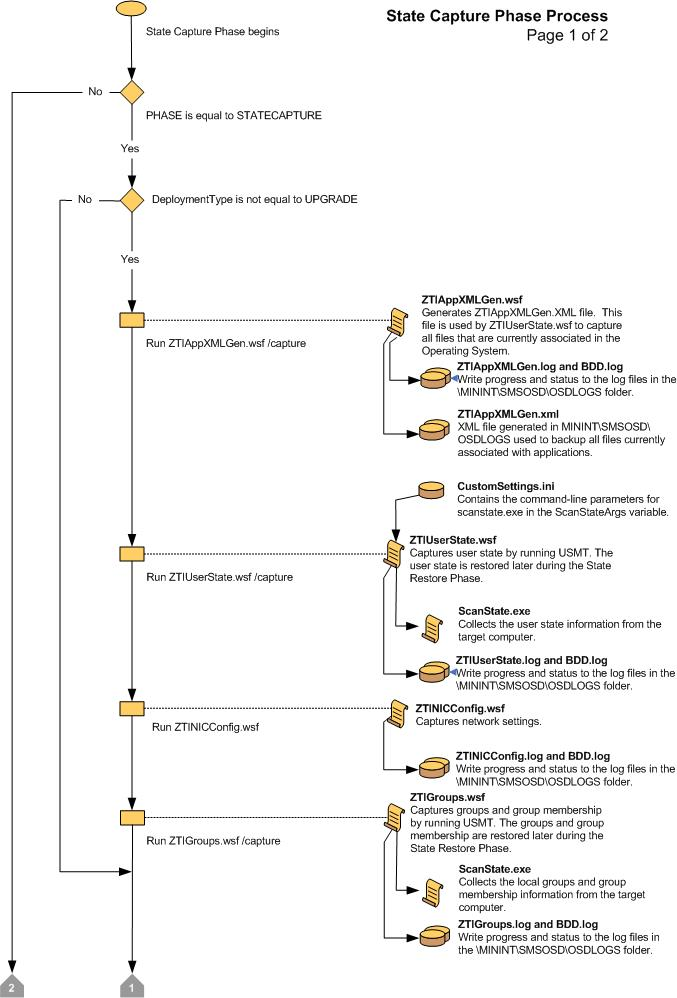
Land Capture (Figure 5 and Figure half dozen)
-
Preinstall (Figure 7, Effigy viii, and Effigy 9)
-
Install (Figure 10)
-
Postinstall (Figure 11 and Figure 12)
-
State Restore (Figure thirteen, Figure 14, Figure 15, and Figure 16)
Figure 4. Flow chart for the Validation Stage
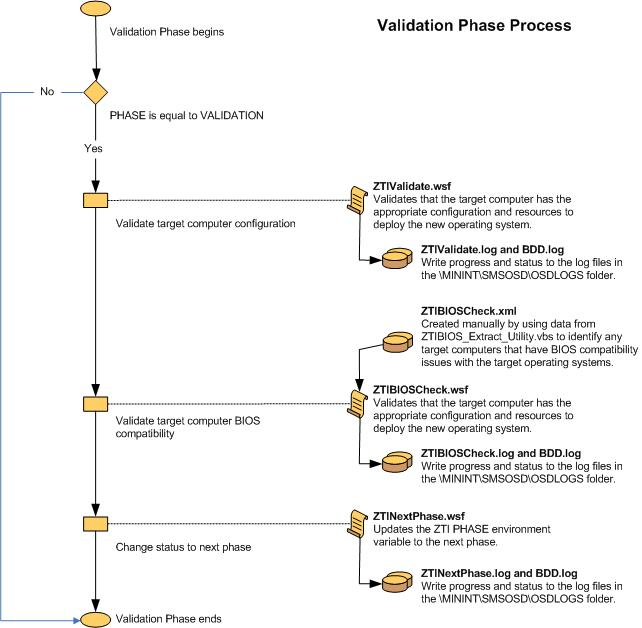
Figure 5. Menstruation chart for the State Capture Phase (1 of 2)
Effigy 6. Period chart for the State Capture Phase (two of 2)

Effigy 7. Flow chart for the Preinstall Phase (1 of 3)
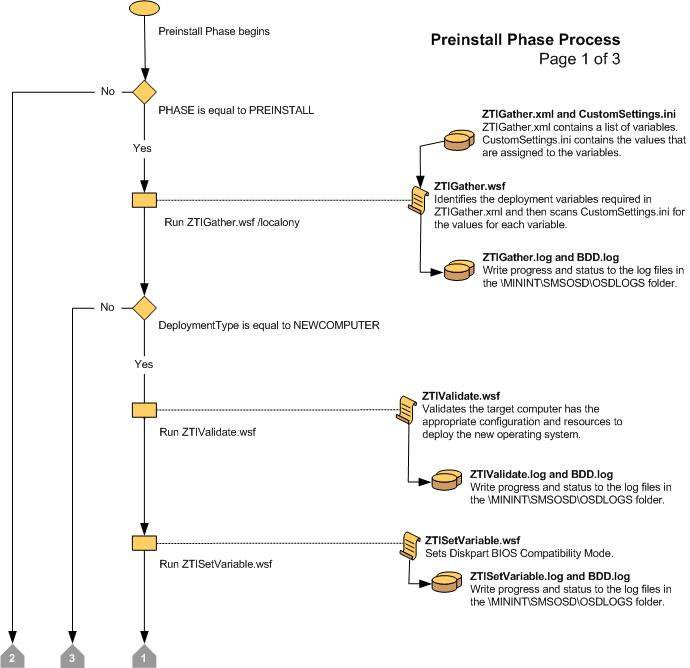
Figure 8. Period chart for the Preinstall Stage (ii of three)
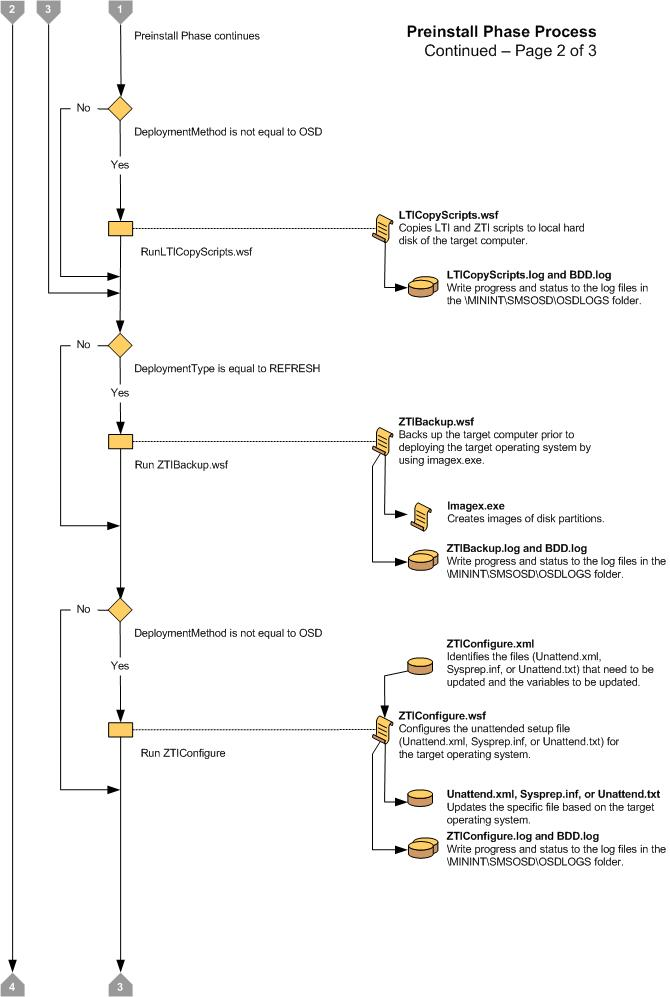
Figure nine. Flow chart for the Preinstall Phase (iii of 3)

Figure 10. Menses chart for the Install Stage

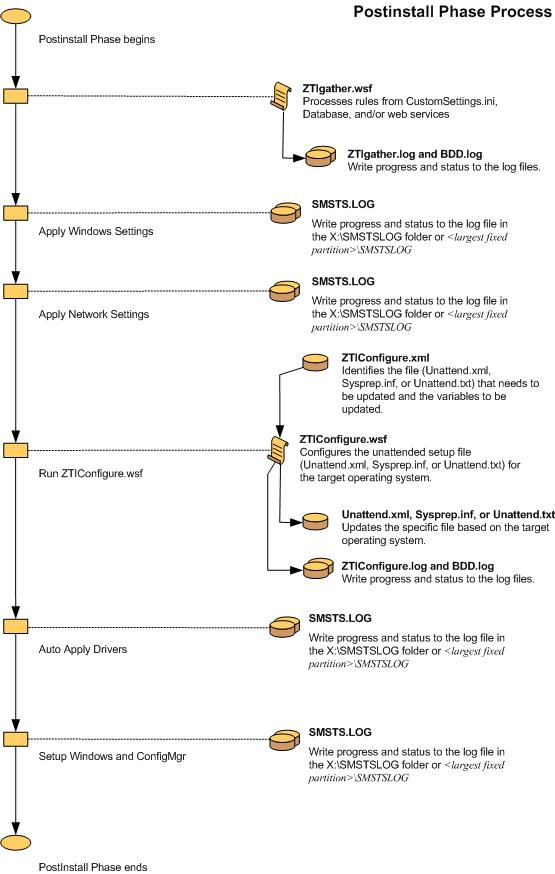
Figure 11. Flow chart for the Postinstall Phase (1 of 2)
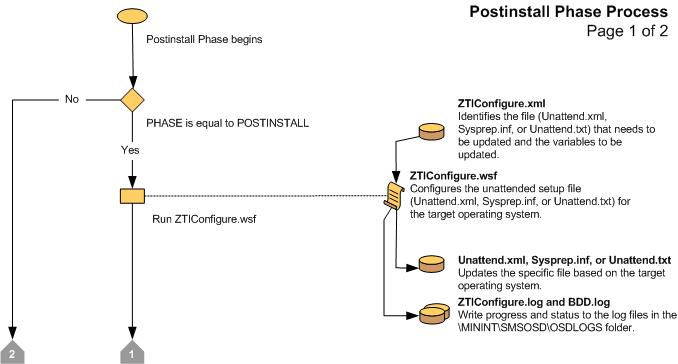
Figure 12 Menstruation chart for the Postinstall Phase (ii of two)

Figure 13. Flow chart for the State Restore Phase (one of four)

Figure fourteen. Catamenia chart for the State Restore Phase (ii of 4)

Figure 15. Flow nautical chart for the State Restore Stage (three of four)
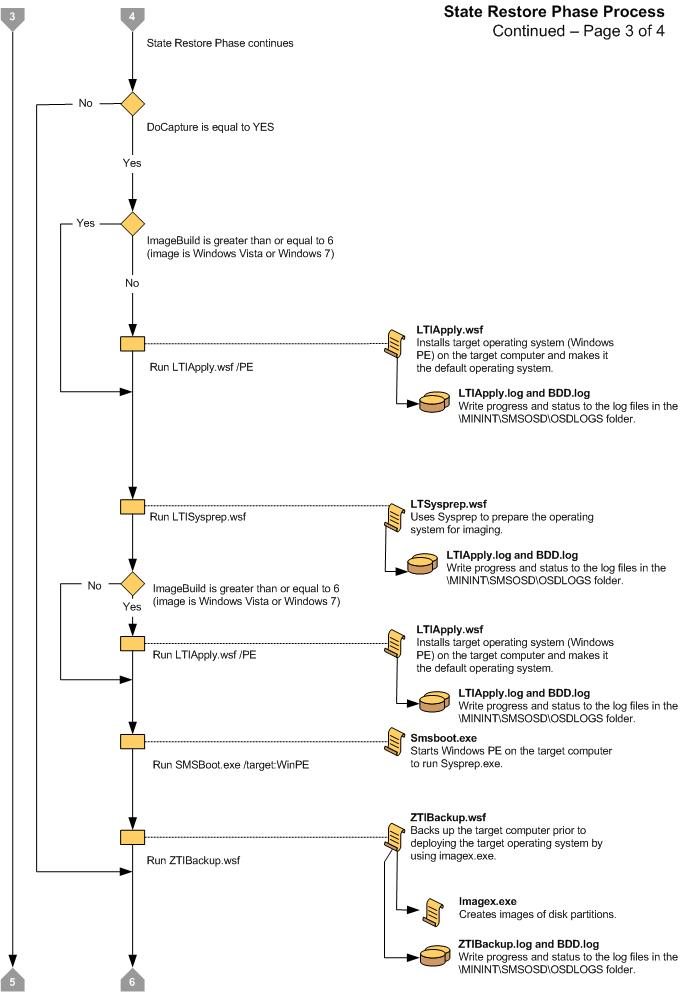
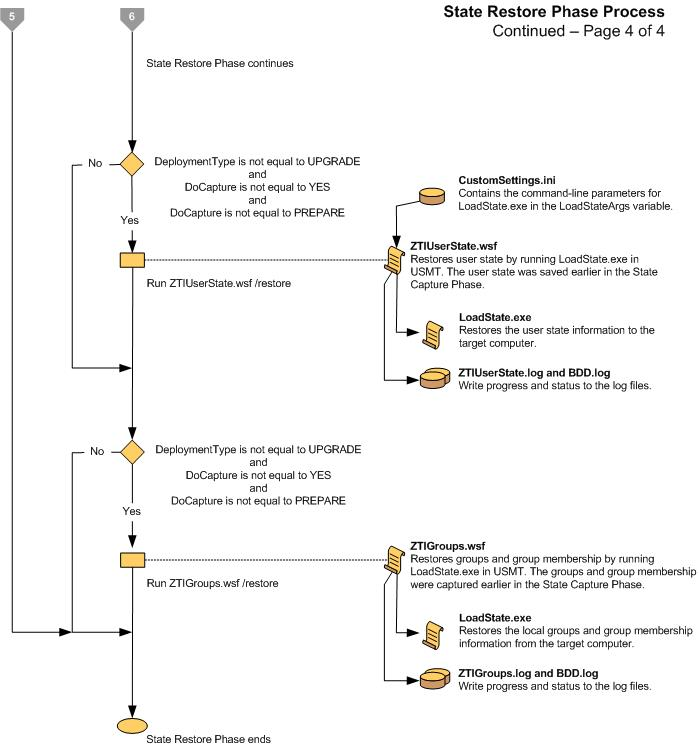
Figure xvi. Flow chart for the State Restore Stage (4 of iv)
ZTI Deployment Process Flowcharts
Menstruum charts are provided for the following phases of ZTI deployment with Configuration Manager:
-
Initialization (Figure 17)
-
Validation (Figure eighteen)
-
State Capture (Effigy nineteen)
-
Preinstall (Effigy 20)
-
Install (Figure 21)
-
Postinstall (Effigy 22)
-
Country Restore (Effigy 23 and Figure 24)
-
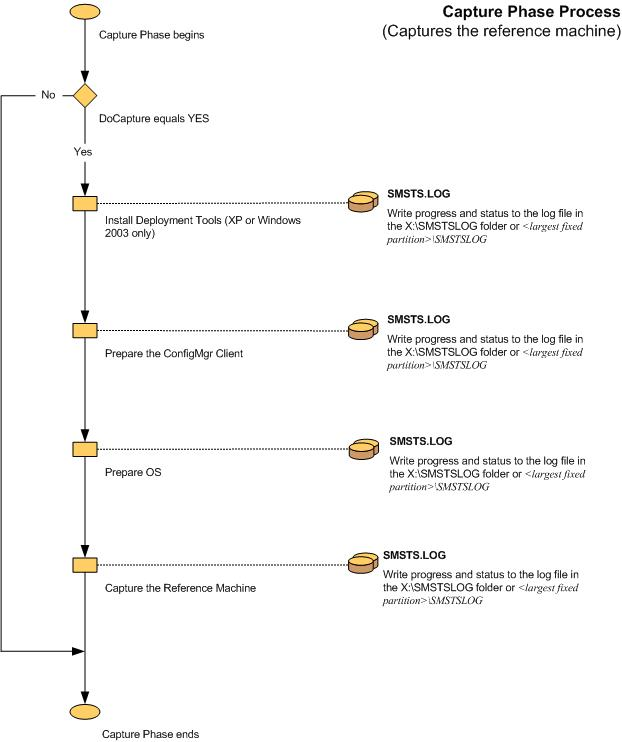
Capture (Effigy 25)
Effigy 17. Flow chart for the Initialization Phase
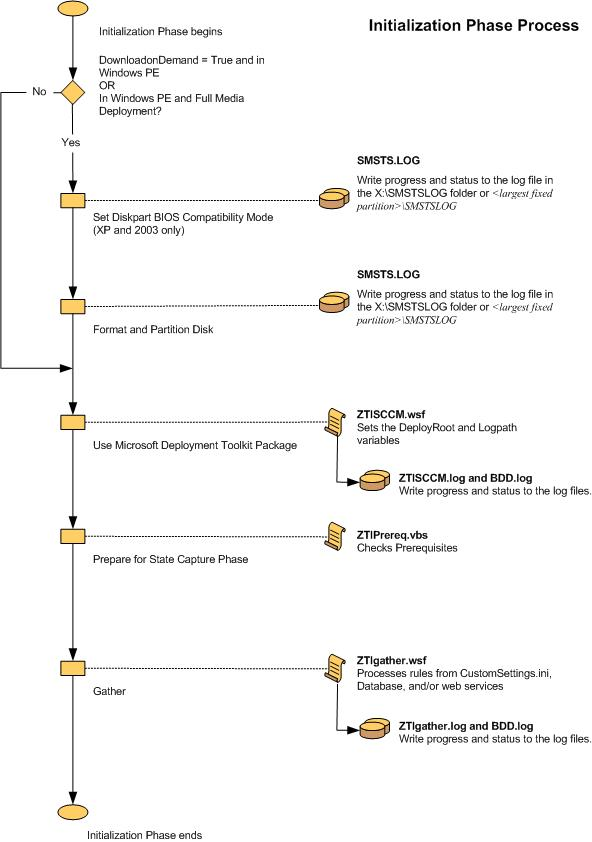
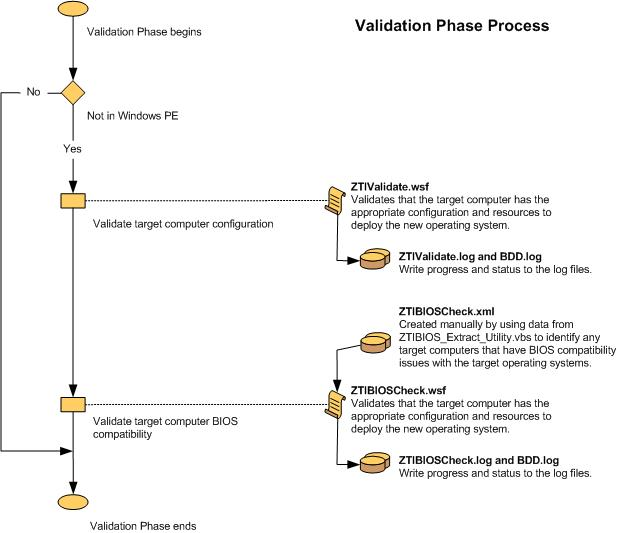
Figure 18. Flow chart for the Validation Stage
Effigy 19. Period chart for the Land Capture Phase
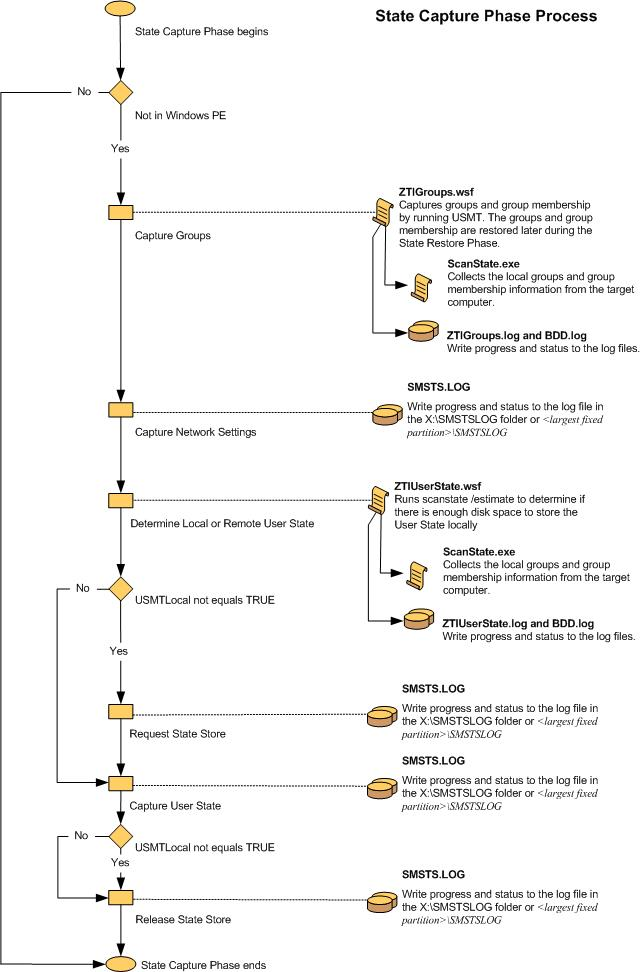
Figure 20. Flow chart for the Preinstall Stage
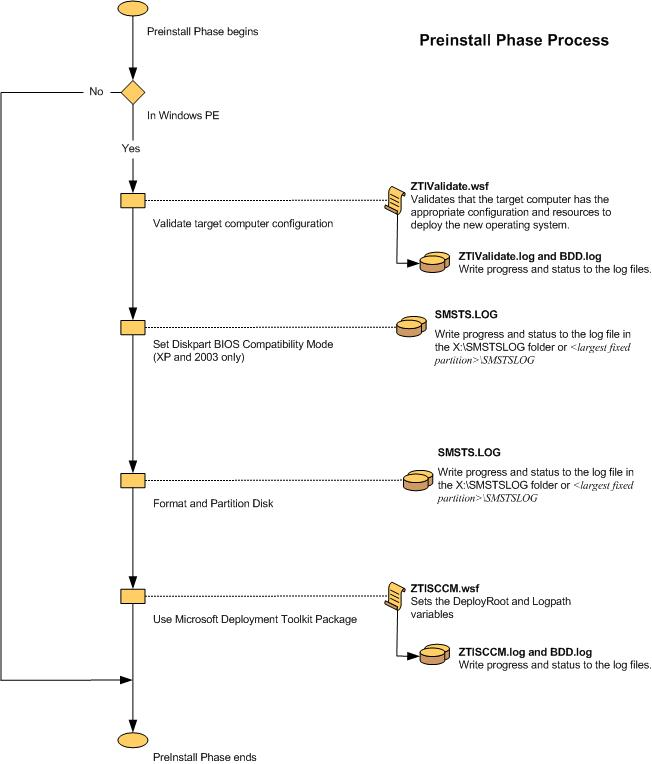
Figure 21. Flow nautical chart for the Install Phase
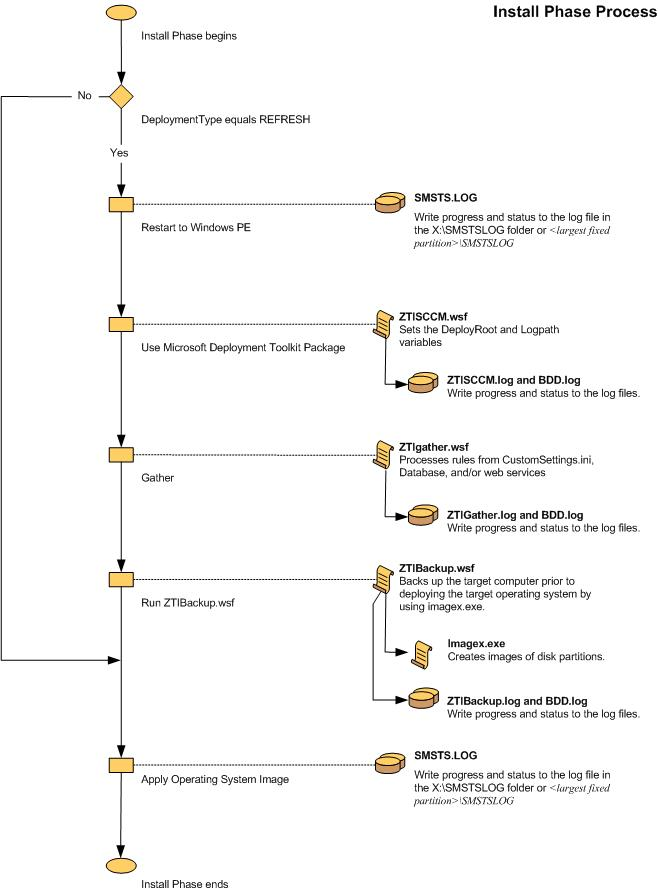
Figure 22. Flow nautical chart for the Postinstall Phase
Effigy 23. Menses chart for the State Restore Stage (1 of ii)
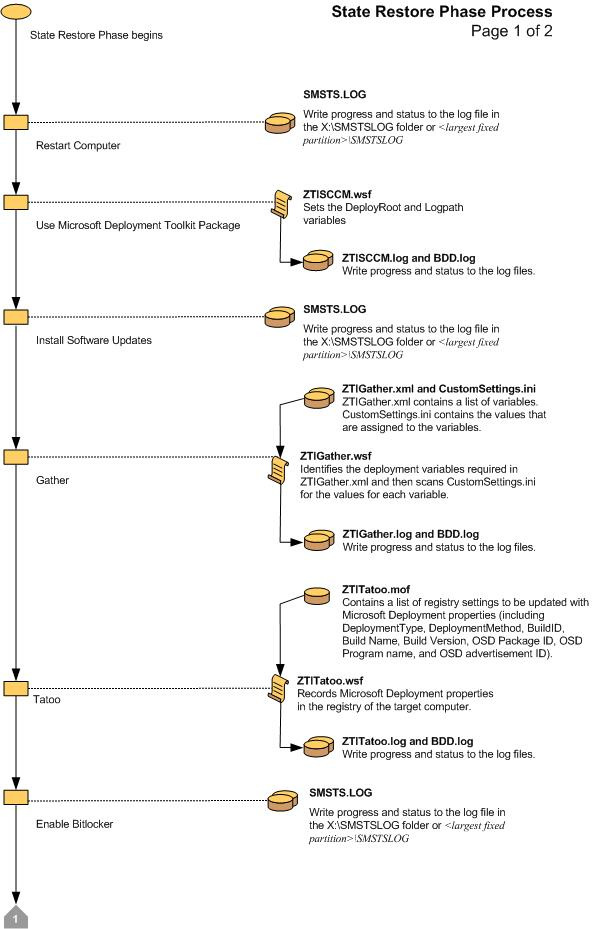
Figure 24. Flow chart for the State Restore Phase (two of 2)
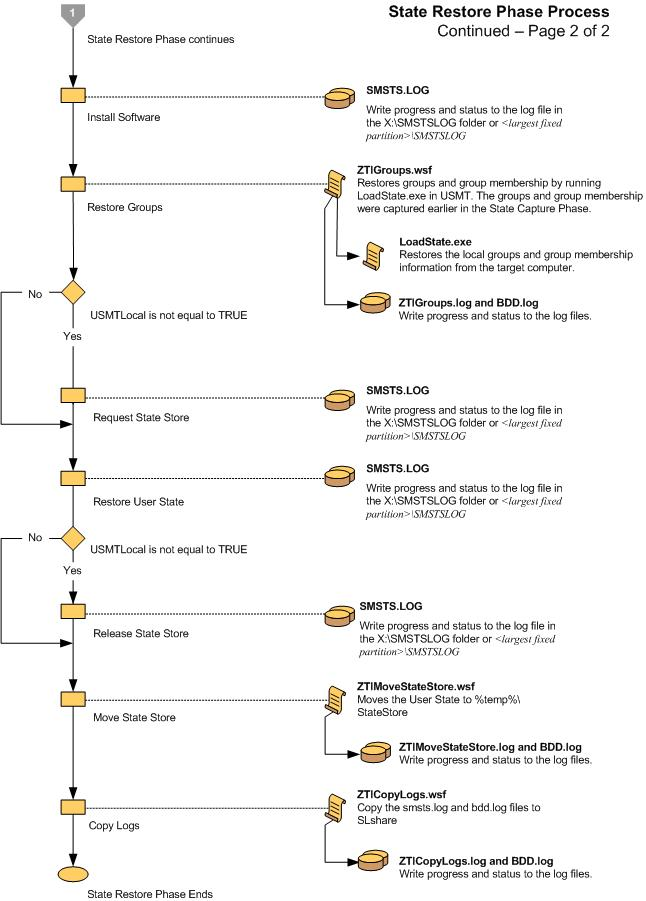
Figure 25. Flow nautical chart for the Capture Phase
Microsoft Support
Microsoft provides Premier and Professional level support for Microsoft Deployment Toolkit.
-
Professional level back up: https://support.microsoft.com/
-
Premier level support: https://premier.microsoft.com/
Note
When contacting support, exist clear that the consequence is with MDT and the specific version.
Source: https://docs.microsoft.com/en-us/troubleshoot/mem/configmgr/troubleshooting-reference
0 Response to "Mdt 2013 Windows 10 Restart Mdt Starts Again"
Enregistrer un commentaire